


HOW TO SET UP YOUR BOX-KAT FOR OUTDOOR USE
The Box-Kat is made for outdoor use, but a strong outdoor setup starts with good preparation. Uneven ground, loose gravel, and changing weather can all affect how the barrier sits, so taking a little extra time to prep the area and secure the braces can help your Box-Kat stay stable and work more effectively.

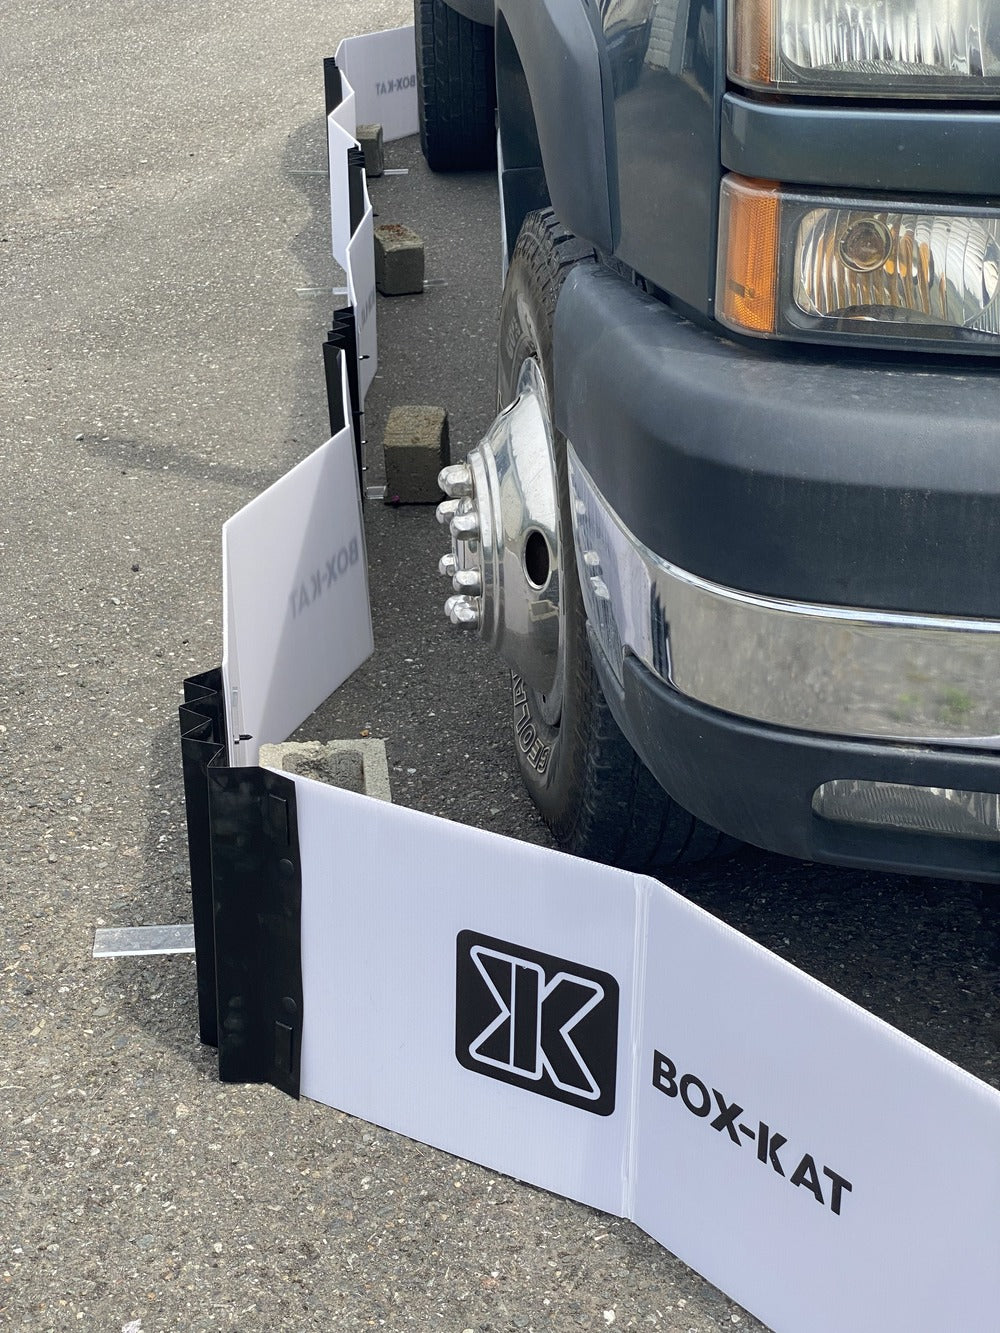
PREPARE THE SURFACE
While the Box-Kat is designed to conform to uneven surfaces, the best results come when you make the parking area as smooth and gradual as possible first. If you’re setting up on gravel or dirt, rake the area to remove large clumps, deep dips, and sudden changes in height. Your goal does not need to be a perfectly flat surface — just a more even one. Once the area is prepared, the black flex panels can do a better job conforming to the ground and helping reduce gaps.
BRACE FOR WIND & WEATHER
Wind and weather can cause the barrier to shift if it isn’t properly secured. To help keep it in place, we recommend using anchor weights such as gallon water bottles, sandbags, or cement blocks. Simply place them on the inside half of the L-shaped support braces. If you’re parked on soil, garden stakes are also a great option. After strong wind or storms, it’s a good idea to check the barrier and make sure everything is still sitting securely.

ADD GALVANIZED MESH FOR EXTRA PROTECTION
If you’re setting up on loose gravel or dirt, adding a layer of galvanized metal mesh can provide extra protection against burrowing underneath the barrier. We recommend extending the mesh 6 to 12 inches beyond the outside perimeter of the Box-Kat. It can be staked down and lightly covered with gravel or dirt to help keep it in place.
TIPS FOR DAILY DRIVERS
Each Box-Kat kit includes one set of wing-nut screws for customers who use their vehicle regularly. During assembly, install them at one of the panel connection points instead of the standard push-in fender clips.
This creates a simple access point that can be opened and closed without tools, making it easy to move your vehicle in and out of the barrier. When you return, just re-tighten the wing nuts to put the barrier back in place.

Frequently Asked Questions
Not at all. The Box-Kat's flex panels are designed to adapt to imperfect surfaces. That said, a little prep can go a long way towards maximizing the barrier's effectiveness.
Yes. The Box-Kat is able to adapt to uneven outdoor surfaces, including gravel and dirt. But the best results usually come when you take a little time to prepare the area first. Raking away large clumps, smoothing out sudden dips, and securing the barrier with anchor weights can help create a more stable setup.
For outdoor setups, we strongly recommend using some type of anchoring or added support. Wind and weather can cause the barrier to shift if it is not properly secured.
Many customers use gallon water bottles, sandbags, or cement blocks placed on the inner L-shaped support braces. The goal is to add stability without damaging the braces. If you are using heavier materials, place them carefully rather than dropping them onto the acrylic supports.
The Box-Kat is built with flexible panels that help it conform to uneven ground, but surface prep still matters.
- Try to make the area as smooth and gradual as possible before setting up.
- On gravel or dirt, rake away large clumps, fill sudden dips when possible, and aim for a surface that allows the panels to sit more evenly.
- Place the Box-Kat's black flex panels over the largest shifts in slope to conform to ground.
If you're parking area has severe changes in elevation, large cracks, or drop-offs, the Box-Kat may have more difficulty. You can always reach out to us at hello@box-kat.com to ask about your specific setup situation.
On loose gravel or dirt, burrowing can be more of a concern than on solid surfaces. For added protection, some customers choose to install galvanized mesh underneath or around the outside perimeter of the barrier. Extending the mesh 6 to 12 inches beyond the edge of the Box-Kat can help discourage burrowing underneath.
Of course. Each kit includes a set of wing-nut screws that can be installed at one of the panel connection points to create a quick-access opening. This makes it easier to move the panels aside when you need to drive and secure them again when the vehicle is parked.
Indoor setups are usually simpler because the surface is more stable and protected from weather. Outdoor setups may require a little more preparation, especially on gravel, dirt, or in exposed areas, but with the right surface prep and support, they can still work very well.